Showing posts with label Landscaping. Show all posts

Tuesday, January 15, 2013

Moving the Georgia Home Garden - Part 2

Please visit and like my new facebook page Georgia Home Garden.

In part 1, I posted about the prep work involved at my new house before I could move my garden.  In this post I detail the finished project.  Garden fever is starting to kick in.

Here is a pic of the old garden at Georgia Home Garden 1.0, I always get nostalgic whenever I visit the old homestead and this was no exception.  The garden looked pretty rough.  The plan was to pry up the frames on each of the beds and haul them to the new house.


Here is a close up after removing one frame, it only took five minutes to pry them up.


After I removed the frames, I decided to rake the soil to loosen the straight edges.  This area can still be used to garden and I am leaving the soil.  I considered hauling the soil to my new house since it is so rich, but I decided that is too much work.  I will start fresh at the new house.


Yes I am from Georgia, and yes I have some red neck in me.  I didn't have anything to tie down the bed frames so I just piled all six in my truck and drove really really slow.  I took back roads and nothing fell out. 


Here is the new spot for the three 4x8 beds.  The plan is to put them right outside the shaded area.


Here they are, all done and ready for some fresh dirt.  There was an unbelievable amount of work in prepping this area to get to this point, but I am looking forward to spending many hours here.


Another angle, they are placed right below the slope where the ground is a little more level.


Saturday, January 12, 2013

Moving the Georgia Home Garden - Part 1

Please visit and like my new facebook page Georgia Home Garden.

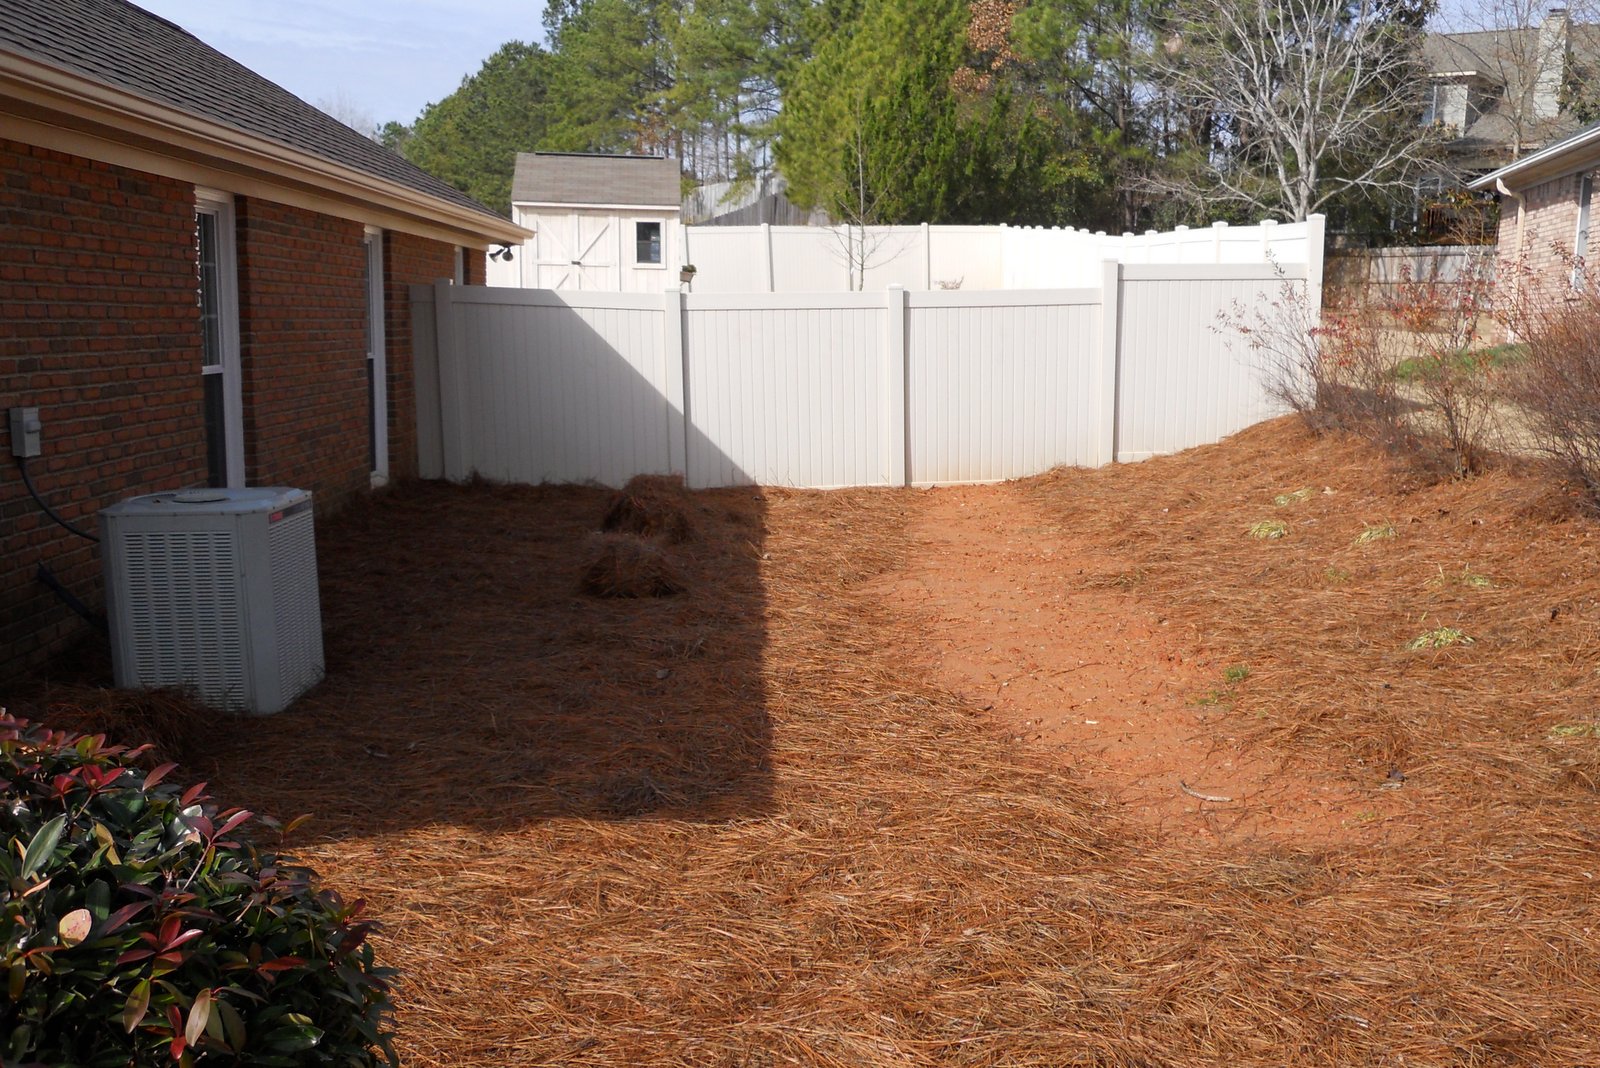
I have started the process of moving my raised beds from Georgia Home Garden 1.0 to the new house.  The old house hasn't sold and I was going to leave the beds there, but those jokers are coming with me now that the house hasn't sold.  I am working on the first garden area at the new house, a North Facing side yard.  This side yard is dead space and had drainage issues when we bought the house, but I think I can get some use out of it. 

So here it is before I started and a complete mess, full of weeds and mushy ground.


You can see the stains on the bottom of the brick, there were no gutters on this side of the house. I had them installed shortly after we moved in.


Part of the problem with the drainage was the ground was sloped toward the house and was full of pits and high spots.


Here is the view from my neighbors yard looking down at my house, you can see how the ground slopes.


I pulled the weeds, brought in 5 yards of fill dirt that was shoveled by hand and wheel barrow. (I am getting a real strong upper back, this brings my tally to 11 yards of material hand shoveled so far.)


View from neighbors house


I started on the house side and graded it away from the house to a low spot.  I then went from the hill side and kept the natural slope but just filled it in to make a nice smooth surface.


I set a string line that was an equal distance from the house and made everything grade toward the string line and then toward my front yard.  The goal was to create a slight gulley for the water to naturally flow toward.  We got a few good rains after this pic was taken and it worked well. The ground is pretty mushy now, but that is only because the dirt is fresh and needs to settle.


I laid pine straw to keep the weeds at bay and left an area open to place the raised beds.


Another angle from neighbors (I get weird looks from them, wondering what I am up to haha.)


Ok, now the most important part.  Placement of the beds was going to be crucial in this North facing garden.  The house shades this area, but the amount of shade depends on the time of day and more importantly the time of year.  I did a lot of reading on that and decided to take a picture of the area at noon on December 21st, which is the Winter solstice.  That is the time of the year when the sun is the lowest in the sky and the shade would be the worst.  If I placed my beds outside this shade range on that day, then they should receive plenty of sunlight because the shade would only get better after that date.  That is it for part 1, everything is ready to go now.


Thursday, January 10, 2013

Burgundy Lorapetalums - Creating Landscape Privacy

Please visit and like my new facebook page Georgia Home Garden.

We have been in our new house almost five months and it is really starting to feel like home.  I think it is perfectly natural to have a little buyer's remorse right after you move away from your first home into your second home.  I joked with my wife that your first house is like your first love in that you never forget it. (Not the best analogy on my part, needless to say I had to talk my way out of that one) The best cure I have found for home buyers remorse is to start right away at making your new house your own, and I have been doing just that.  Ironically same thing in matters of the heart, the sooner you move on the quicker you get over it, but I digress. 

This project came about because we bought our house during the Summer and when Fall came around and all the leaves fell from the trees I quickly realized my neighbor's house behind me looked right into my backyard.  Our house sits lower than the houses behind us and to the left of us and I didn't notice it in the Summer because my neighbor had a huge Silver Maple that screened the other house.

My solution was to plant some sort of shrub that would keep its foliage all year and I needed something large since the neighbors sit on higher ground than me.  I searched the Internet on Hollies, Leyland Cypress, Arborvitaes, etc. and all of them had something I didn't like about them.  I thought on the issue for a few weeks and it finally occurred to me what the solution might be.  Our new house has several Lorapetalum bushes all around it and I remember reading that they can get pretty large.  After researching several varieties I settled on "Burgundy Lorapetalums" because they get 8-12 feet tall and 6-8 feet wide.  They are also very drought tolerant and grow very fast.

I stopped by the same nursery down the road where I bought my trees and it was fate, they had exactly five 3 gallon sized plants which is the exact same size and number that I wanted.  After some negotiating with the owner I got them for 25% off and they only cost me $50 dollars total for all five.  I planted two together to screen the neighbor to my left, two together to screen the neighbor in the back, and that last one in the corner of the fence behind the Nuttall Oak tree.  I am happy with the results and I can't wait to see them grow.

Here is the final results picture.
Not the best picture, but here is the fence line. 

This is the neighbor to the left. I want to screen those two windows from my pool.  It is hard to see but there are so many red marks on the grass because I kept measuring and changing my mind on plant placement.

 The is the neighbors house behind me.
Two issues here, the windows to the right and a window on the second story peeking through that pine tree.

Closer view, my neighbors Silver Maple provides screening in the summer.
My fence is useless since their house sits higher.

Fence line ready for plants.

I got halfway through planting and realized I needed to take some pictures while planting. I start by digging my hole 1.5 to 2 times bigger than the plant root ball.

I know they say don't amend in clay soil because the plant will treat it like a clay pot but I did it anyway.  I poured some good soil on bottom and then planted and filled the remainder with mostly good soil.

After planting I put the old soil on top.  It is usually better to use the majority of your existing soil and mix in amendments which is what I did when I planted my trees, this time I just got lazy and filled the hole with the good dirt.  Oh well.

Since the plants are located on a slope, I built a moat around the lower end of the plant to create a mini dam.  This allows water to build up and soak into the root ball rather than just flowing down the hill.

Here are the first two that should grow together and screen this neighbors windows.

Here are the remaining three that should screen the neighbor to the rear.  The one in the corner is for their second story window.  Traditionally you would not plant a shorter plant behind a taller tree, but since this is for screening only I made an exception and think it will provide interest behind the tree in the Winter.

Sunday, December 30, 2012

More Tree Plantings - Nuttall Oaks

Please visit and like my new facebook page Georgia Home Garden.

In my previous post, I detailed my first tree planting at my new house.  It was a huge b&b Nuttall Oak that was planted in the Northwest corner of my yard.  In the picture below that tree is planted where the shed is.  I also wanted a big tree because I wanted to provide screening from my neighbors behind me.

I can't stop at planting one tree, what fun would that be?  Lucky for me, within 10 minutes of my new house are two nurseries.  I stopped by one of them and I scored two more Nuttall oaks.  Better than that is I got them for a steal of a price.  They were 50% off and only cost me $25 per tree.

They aren't the prettiest trees, in fact they are pretty much broom sticks with little to no branching.  However, I can see past that and I know with a little care they will make fine trees.  One of the two was in serious decline and may not make it, but for the price it was worth a shot.

I planted the trees in my South facing side yard and I hope in 5 to 10 years they will provide shade for my house in the afternoon sun during our hot Summers.  In the picture below, the pin marks represent roughly where the trees were planted.  They are pretty tall trees at about 12 feet, but since they were crooked broom sticks, I staked them down to help them grow straight and protect them from the wind.

I look forward to posting about these trees in the years to come and to chart their growth.

 Here is the better looking of the two trees.
My little helper being silly in front of it.


Here is where I planted the two new Nuttall Oaks.
That side yard slopes down toward the street.
The trees are planted on a slight slope.


Wednesday, December 19, 2012

First Tree Planting - Nuttall Oak

Please visit and like my new facebook page Georgia Home Garden.

In my last blog post, I ended with a picture of the corner of my yard and a big red "X".  Obviously from the subject of this post it is obvious that I planned to plant a tree there, and not just any tree it had to be the perfect tree.

A little background on me and trees:
I am a little bit of a tree snob, there are only certain varieties that I like.  What I look for in a tree is that it has a strong central leader at least the first 6 to 10 ft up the tree.  Then coming off that central leader, I like a nice even branching structure.  I also prefer deciduous trees that have great fall color, mostly red.  At my old house, I planted several red maple varieties because they fit all those characteristics.  However, red maples grow a lot of surface roots and they make landscaping difficult around them.  Because of this I knew I didn't want red maples at my new house.  When we moved into the new house, I had been researching trees for weeks on the web and then it hit me.

At our church there are some of the most beautiful trees that I have ever seen.  They have a wonderful branching structure, strong central leader, beautiful pyramidal to oval shape, just great looking trees.  I asked someone who worked at the church if they knew what kind of trees they were.  After some research, they told me Nuttall Oaks.  I was like, say that again, never heard of it.

Within minutes I was on my phone googling them and within five minutes I knew this was the one.  It has all the characteristics I want and even more.  It turns out this is an under used tree, but has all the great characteristics of so many other oaks without any bad ones.  It has well behaved roots and actually prefers wet sites which was good for me because the area is kind of a gulley.  Here is a nice article about the Nuttall Oak.

Ok, I know that was probably way too much background information for a blog post, but I get pretty passionate about my trees.  I will stop there and suggest you look up the Nuttall Oak, now on to the pics.

So here is the spot with the big red "X" marking it


I purchased a 2.5 inch caliper tree from a local nursery.
I wanted something big for this site because I want it to fill in fast.  
Ball and burlap trees of this size are too big for me to handle.

These two guys were good, they made short work of digging in the hard clay.

Here she is, a big one, over 15 ft tall.

They rolled it into a wheel barrow and had to muscle it up there.

You can see how tall it is compared to the guys.

Here it is all finished, I can't wait to watch it grow.

Another perspective from farther away.

You have to take a picture to commemorate a tree planting.
Posted by Picasa