I detailed in part 1 of this project the purpose behind this huge undertaking. The main reason of attempting something so labor intensive was the cost savings. In this post I am going to detail what all I had to do before I could lay the sod.
As I mentioned in part 1, the first task was to scrape and dig the entire yard by hand. When I first started I was just using a simple garden hoe and it worked great because it was just dead grass roots on top of dirt. I had to eventually get on my hands and knees and use a shovel to undercut the remaining St. Augustine grass and live weeds. This is a picture of the mess. That little patch of green near the tree was live St. Augustine and that was the worst part to dig by hand.
The next step after digging the majority of the yard was to tackle the mountain leading up to my shed. This involved two steps. Step one was I had 5 yards of fill dirt delivered and dumped on the hill. The truck made huge ruts in my yard but I didn't care because it saved me a lot of work by dumping it where I needed it. This fill dirt was primarily clay which packed well and I raked and shoveled it around until I got a pretty decent slope. Step two was I had 5 yards of "top soil" delivered and dumped in my driveway. I then used about a yard of top soil to top dress the fill dirt and prep the sod. The rest of the top soil would be used as I laid sod to fill in any dips. I wish I would have taken more pics of this process, but this was what it looked like after I was done.
I then realized after my first attempt that the grade was still too steep so I worked the hill some more and used a 10 ft 2x4 to screed the hill and smooth it out. This was the final product. It is really hard to appreciate how much better this looked from the picture, but it did.
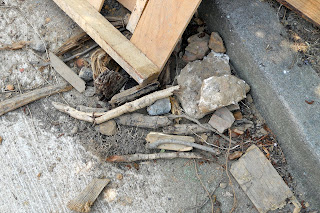
Now it is time for me to rant about the quality of my "top soil" that they delivered. I specifically told the guy that I was using this to lay sod and I wanted the top soil to be good quality and not loaded with a bunch of debris. "Oh yeah, sir you will love this stuff." The stuff they call top soil today makes me laugh, it is basically fill dirt but without the huge clay clods. I had all kinds of rocks, wire, wood, sticks, etc.
This is just of little bit of what I found in the "top soil". How come when I watch Yard Crashers and they bring in a truck load of top soil it is always dark black and looks like a truck load of Miracle Gro garden soil? Because it is TV that is why and not reality.
So here is what it looked like when the sod arrived. As you can see I still had a good bit of weeds to dig up near the house. I just decided to do it as I went because I ran out of time.
This part of the back yard looked a lot better and I had it pretty much ready to go. The company that delivered the sod dropped the pallets exactly where I wanted them. That saved me some work. The lighter dirt in the picture is the top soil I used to smooth out the grade.
In part 3 I will detail the task of laying the sod and bringing it all together


3 comments:
oh my, my back hurts just reading this! i bet it will look real nice in the end.=)
What a project! I know you will be happy with the results, but for now WOW that is a lot of work, especially by hand.
Kelli - My back has held up well, my right knee on the other hand is another story. It has been very sore. It is coming together nicely though.
Grafix - It is indeed a lot, but that will make it all the more rewarding.
Post a Comment